How to Morph Sequences
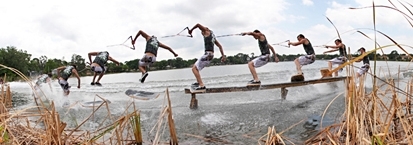
Ever wonder how people manage to take those pictures with the rider appearing so many times in frame? I’ll tell you a secret. It’s not magic, it’s Photoshop! Similar effects can also be achieved in camera, but often require a flash with a strobe mode, and an extremely dark background… in general, the photos you’re used to seeing these days are produced by compositing several images in Photoshop.
Taking a good, morph-able sequence takes a solid hand, skill and of course, a camera with a fast enough motor-drive. Have all those things? Then you might want to learn the art of the morph.
Not all sequences will work. If the trick is shot with the rider coming directly at you, each frame will be directly on top of each other, and it will be difficult or impossible to morph. If you are moving while shooting the photo, such as in the tow or chase boat, it will work, however it is more difficult to get the background to line up. If you are using a fisheye that distorts the horizon and rider, it also makes it more difficult. The easiest sequences to use are ones where the rider is moving across the frame and you are sitting still.
For this lesson I chose a rail photo that is fairly straightforward. However, there were some issues, such as the framing of the last few shots where the rider was too far left in the frame. There are ways to compensate for this, so I made due.
NOTE: There are many ways to morph a sequence in Photoshop. You may have better luck and more control using layer masks, which can make it easier if you mess up. The eraser method is just a good place to start. Nearly every task in Photoshop can be accomplished a number of different ways. To each their own. These are some basics to get you started.

Step 1
Create a new document that is as tall as your images, and but quite a bit wider. You may have to adjust this canvas size as you add images if you run out of room, but about 5 times wider is a good place to start.

Step 2
Take the first image of your sequence, select all (ctrl A), and use the move tool to drag it to the side of the new image.

Step 3
Take the next image in the sequence, select and drag on top of first image, lining it up as best you can using the trees, shoreline, or whatever other elements of the picture you have. I have found that you don’t have to select all, in fact, if you take only the piece of the image you are going to actually leave, it’s a bit easier. You can change the opacity of the layer to see through it and help line it up using the opacity slider in the layers palette.

Step 4
You will want to zoom on the area you are working on so you can see what you are doing for this step. Use your arrow keys to get the adjustment as precise as possible, making sure the background and foreground overlap appropriately. Once you get it close, switch to the eraser tool and use it to uncover the parts of the first image you want to be able to see. This is where it gets tedious. Zooming way in will make it easier to see what needs to be erased and what doesn’t. You can also select areas with the lasso tool and delete the selection. There are a number of ways to achieve the same goals in Photoshop.
Step 5-however many photos you have
Repeat, until the sequence is complete.
Some tips for getting the best results:
-Adjust the size and hardness of the eraser when you are working on details. Making it less hard will make your eraser lines less obvious.
-Always start erasing from the side you started adding images. This will make it easier to know how much you need to erase.
-Once you start erasing, it’s a lot easier to see if slight placement adjustments need to be made.
-With the eraser tool, if you mess up, your best option is to step backwards. When I am doing close in detail work, I make sure to click rather than dragging so I can just reverse my last stroke if necessary and don’t have to entirely start over.

Step 6
Now go to view and select fit on screen. Now you can easily see what you need to crop away. Sometimes, depending on how much the action moved in the frame, you will have dead areas that you cannot crop without losing some other parts of the image. The solution here is to use the clone stamp tool to clone in more water, or sky, or whatever is missing.

Step 7
You are almost done. Hopefully you did a good job cleaning as you went, but sometimes you need to go back and touch up a few spots you missed. You will have you figure out which layer it is that needs to be edited.
Step 8
Save the image as a PSD, that way the layers will be maintained in case you want to go back and check or change anything. Then you can save as a jpeg, which will merge the layers, or just merge the layers manually. I always like to save the psd file first though, incase I get motivated to improve my work, etc.

Step 9
Once the layers are merged, the clone stamp tool can come in handy for slight touch ups or if your missing say, a part of a handle. Finally I do basic adjustments such as levels, curves, brightness and contrast and sharpening. I find it’s easier to do this once the images are all merged to maintain consistency.
And that’s is. You can pretty much do these as sloppily or as neatly as you want, to get it perfect though, can easily take hours. Do it too quickly, and you’re liable to end up on Photoshop disasters! Remember though, practice makes perfect so don’t be frustrated if your first effort looks like crap.


November 15, 2016
Cool and awesome post. Thanks for the sharing.